
Analysis organization
It just for intoducing computer forensic most of the work you will do here can be applied to actual casework. The practice floppy (in raw image format from a simple dd), create the practice floppy with the following command. First practical with image of "practical.floopy.dd".
 |
| create image from flopy |
For the One way of organizing your data would be to create a directory in your “home” directory for evidence and then a subdirectory for different cases. Since we will be executing these commands as root, the home directory is /root:
 |
| Create directory |
The tilde (~) in front of the directory name is shorthand for “home directory”, so when I type ~/evid, it is interpreted as $HOME/evid. If I am logged in as root, the directory will be created as /root/evid. Needed another directory for a special mount point for all subject file system analysis, This is used to separate for a common system used in the processing of evidence.
 |
| Create directory analysis |
Determining the structure of the disk
We can get the partition information on that disk with:
 |
| Partion Information from Hardisk ATA(SATA) |
We can redirect the output of this command to a file for later use by issuing the command as:
| Redirect to file output |
Name of file output is fdisk.fdisk1 will be created in /root/evid. If you use the fdisk in the flopy you can get the strange output. The output will just confuse, the fdisk command works by examining the partition table in the first sector (0) of a device. So don’t use fdisk on the practice floppy.
Creating a forensic image of the suspect disk
By dd to create the image of the disk.
 |
| Create Image |
Change the readwrite permissions of your image to read only
| Permission |
The image file was created and now restore the image to another disk "clone" of the original disk.
 |
| Put another floppy (blank) |
Mounting a restored image
By assuming this is a DOS formatted disk from Win 98/95 machine. the mounting of the image / mnt / analysis above are some command options are used to protect the disk and the system. As for some of the mount command options like the "-o ro, noexec" option determines ro (readonly) and noexec to protect from the execution of the user.
| Mount |
You can check by looking the content of the image file and Be sure to unmount the disk when you finish.
 |
| Mount finish |
Mounting the image using the loopback device
Another way to view the contents of the image without having to restore it to another disk is to mount using the loop interface.
| Mounting using loopback |
After mounting you can browse the content of the file and if you are finished to see the content you must unmount the image of the disk.
 |
| Unmount |
File Hash
Using sha1sum to hashing the file image. It is imprtant step to verify the integrity of the data.
 |
| Hashing |
The redirection in the second command allows us to store the signature in a file and use it for verification later on. We can get a very useful list of SHA hashes for every file on a disk by loop mounting the image again, and then changing to the /mnt/analysis directory. By using the find command and an option that allows us to execute a command on each file found.
| Find |
Looking the result from hash file using cat command to stream the file to standard output.
 |
| Using cat with result hash |
And than verify of the integrity data from the image disk clone with -c command, to read more about this hashing and command maybe you can read my previous post in this blog...see this read more about hashing. If the sha hash match you can get report like this.
 |
| Report hash match |
The Analysis
By using ls command to see the content from the image disk in the directory /mnt/analysis. If you want to save a copy of each command’s output, be sure to direct the output file to your evidence directory (/root/evid/) using an explicit path.
 |
| ls command |
identify permission, date, etc. and than –R option to list recursively through directories. You might want to pipe that through less.
 |
| Other ls command |
 |
| The output |
Making a List of All Files
Even these phase same for using the ls and find command, maybe you must be creative with the manual command (man) it is importan because in the man of command include various list options from he command. |
| List all files |
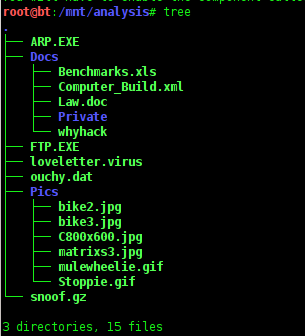 |
| Tree |
 |
| grep file |
It is the example of file command for compares each file's header, if there are have a large number of files without extensions have changed, so run the file command on all the files on a disk. After running the file commands using "find and exec" for looking resulting list you can use "cat, less and grep" commands.
 |
| Using find -exec and cat command |
 |
| Using grep command |
To be continue


0 comments:
Post a Comment